Contributing guide
NeuroKit2 welcomes everyone to contribute to code, documentation, testing and suggestions.
This package aims at being beginner-friendly. And if you’re not yet familiar with how contribution can be done to open-source packages, or with how to use GitHub, this guide is for you!
Let’s dive right into it!
NeuroKit’s style
Structure and code
The NeuroKit package is organized into submodules, such as ecg, signal, statistics, etc. New functions should be created within at the appropriate places.
The API (the functions) should be consistent, with functions starting with a prefix (plot_, ecg_, eda_, etc.) so that the user can easily find them by typing the “intuitive” prefix.
Authors of code contribution are invited to follow the PEP 8 style sheet to write some nice (and readable) python.
That being said, human readability should always be favoured over anything else. Ideally, we would like the code in NeuroKit to be understandable even by non-programmers.
Contrary to Python recommendations, we prefer some nicely nested loops, rather than complex one-liners [“that” for s if h in i for t in range(“don’t”) if “understand” is False].
The maximum line length is 100 characters
Please document and comment your code, so that the purpose of each step (or code line) is stated in a clear and understandable way.
Don’t forget to add tests and documentation (a description, examples, etc.) to your functions.
Run code checks
Once you’re satisfied by the code you’ve written, you will need to run some checks to make sure it is “standardized”. You will need to open the command line and install the following packages:
pip install isort black docformatter flake8 pylint
Now, navigate to the folder where your script is by typing cd C:\the\folder\of\my\file. Once you there, you can run the following commands:
isort myfile.py -l 120  --balanced --multi-line 3 --lines-between-types 1 --lines-after-imports 2 --trailing-comma
black myfile.py --line-length 120
docformatter myfile.py --wrap-summaries 120 --wrap-descriptions 113 --blank --in-place

flake8 myfile.py --max-line-length=127 --max-complexity=10 --ignore E303,C901,E203,W503
pylint myfile.py --max-line-length=127 --load-plugins=pylint.extensions.docparams --load-plugins=pylint.extensions.docstyle --variable-naming-style=any --argument-naming-style=any --reports=n --suggestion-mode=y --disable=E303 --disable=R0913 --disable=R0801 --disable=C0114 --disable=E203 --disable=E0401 --disable=W9006 --disable=C0330 --disable=R0914 --disable=R0912 --disable=R0915 --disable=W0102 --disable=W0511 --disable=C1801 --disable=C0111 --disable=R1705 --disable=R1720 --disable=C0301 --disable=C0415 --disable=C0103 --disable=C0302 --disable=R1716 --disable=W0632 --disable=E1136 --extension-pkg-whitelist=numpy
The first three commands will make some modifications to your code so that it is nicely formatted, while the two last will run some checks to detect any additional issues. Please try to fix them!
PS: If you want to check the whole package (i.e., all the files of the package), run:
isort neurokit2 -l 120 --balanced --multi-line 3 --lines-between-types 1 --lines-after-imports 2 --trailing-comma --skip neurokit2/complexity/__init__.py --recursive
black neurokit2 --line-length 120
docformatter neurokit2 --wrap-summaries 120 --wrap-descriptions 113 --blank --in-place --recursive

flake8 neurokit2 --exclude neurokit2/__init__.py --max-line-length=127 --max-complexity=10 --ignore E303,C901,E203,W503
pylint neurokit2 --max-line-length=127 --load-plugins=pylint.extensions.docparams --load-plugins=pylint.extensions.docstyle --variable-naming-style=any --argument-naming-style=any --reports=n --suggestion-mode=y --disable=E303 --disable=R0913 --disable=R0801 --disable=C0114 --disable=E203 --disable=E0401 --disable=W9006 --disable=C0330 --disable=R0914 --disable=R0912 --disable=R0915 --disable=W0102 --disable=W0511 --disable=C1801 --disable=C0111 --disable=R1705 --disable=R1720 --disable=C0301 --disable=C0415 --disable=C0103 --disable=C0302 --disable=R1716 --disable=W0632 --disable=E1136 --extension-pkg-whitelist=numpy --exit-zero
Avoid Semantic Errors
Most errors detected by our code checks can be easily automated with isort, black, and docformatter. This leaves us with the semantic errors picked up by pylint, the last style check, which often have to be fixed manually. Below is a list of the most common semantic errors that occur when writing code/documentation, so before you commit any changes, do make sure you have fixed these.
Documentation
Missing function arguments in
ParametersandReturns.In internal functions, missing
Returnssection detected only ifParametersis documented but is not followed by returns documentation.Failure to detect documentation of arguments when they are done simultaneously in one line:
a, b, c, discard, n, sampling_rate, x0 : int
will result in a pylint error like a, b, c, discard, n, sampling_rate, x0" missing in parameter documentation (missing-param-doc) so do document each argument separately.
Argument name different from documentation
Code
Unused arguments
Unused variables
Merge
ifarguments, for example:if isinstance(ecg, (list, pd.Series))rather thanif isinstance(ecg, list) or isinstance(ecg, pd.Series)
Development workflow
The NeuroKit GitHub repository has two main branches, master and the dev. The typical workflow is to work and make changes on the dev branch. This dev branch has a pull request (PR) opened to track individual commits (changes). And every now and then (when a sufficient number of changes have been made), the dev branch is merged into master, leading to an update of the version number and an upload to PyPi.
The important thing is that you should not directly make changes on the master branch, because master is usually behind dev (which means for instance, maybe the the things you are changing on master have already been changed on dev). The master should be a stable, tested branch, and dev is the place to experiment.
This is a summary of the typical workflow for contributing using GitHub (a detailed guide is available below):
Download GitHub Desktop and follow the small tutorial that it proposes
Fork the NeuroKit repository (this can be done on the GitHub website page by clicking on the Fork button), and clone it using GitHub Desktop to your local computer (it will copy over the whole repo from GitHub to your local machine)
In GitHub Desktop, switch to the dev branch. You are now on the dev branch (of your own fork)
From there, create a new branch, called for example “bugfix-functionX” or “feature-readEEG” or “typofix”
Make some changes and push them (this will update your fork)
Create a pull request (PR) from your fork to the “origin” (the original repo) dev branch
This will trigger automated checks that you can explore and fix
Wait for it to be merged into dev, and later see it being merged into master
How to use GitHub to contribute
Step 1: Fork it
A fork is a copy of a repository. Working with the fork allows you to freely experiment with changes without affecting the original project.
Hit the Fork button in the top right corner of the page and in a few seconds, you will have a copy of the repository in your own GitHub account.

Now, that is the remote copy of the project. The next step is to make a local copy in your computer.
While you can explore Git to manage your Github developments, we recommend downloading Github Desktop instead. It makes the process way easier and more straightforward.
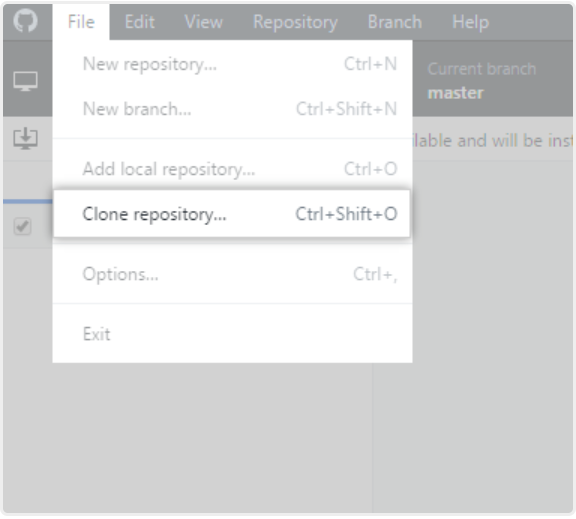
Step 2: Clone it
Cloning allows you to make a local copy of any repositories on Github.
Go to File menu, click Clone Repository and since you have forked Neurokit2, you should be able to find it easily under Your repositories.
Choose the local path of where you want to save your local copy and as simple as that, you have a working repository in your computer.
Step 3: Find it and fix it
And here is where the fun begins. You can start contributing by fixing a bug (or even a typo in the code) that has been annoying you. Or you can go to the issue section to hunt for issues that you can address.
For example, here, as I tried to run the example in ecg_fixpeaks() file, I ran into a bug! A typo error!
Fix it and hit the save button! That’s one contribution I made to the package!
To save the changes you made (e.g. the typo that was just fixed) to your local copy of the repository, the next step is to commit it.
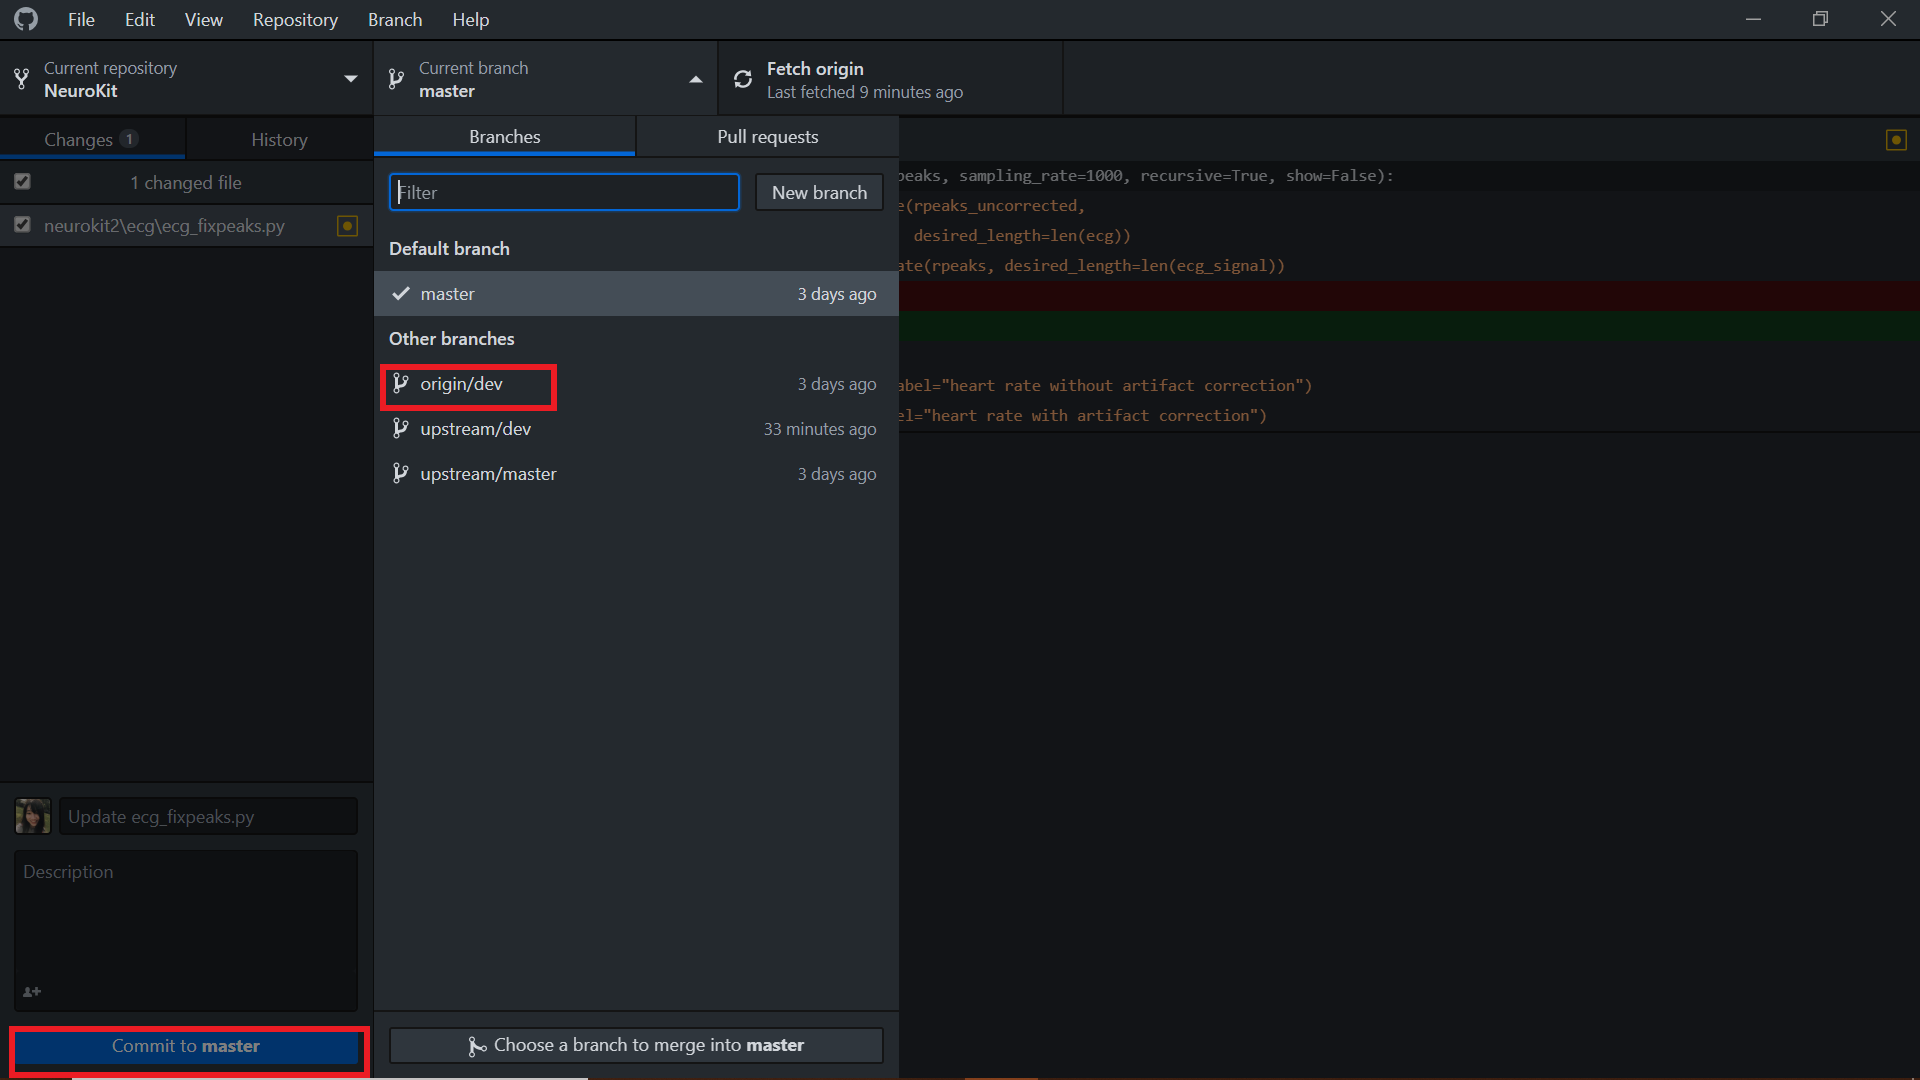
Step 4: Commit it and push it
In your Github Desktop, you will now find the changes that you made highlighted in red (removed) or green (added).
The first thing that you have to do is to switch from the default - Commit to Master to Commit to dev. Always commit to your dev branch as it is the branch with the latest changes. Then give the changes you made a good and succinct title and hit the Commit button.
Committing allows your changes to be saved in your local copy of the repository and in order to have the changes saved in your remote copy, you have to push the commit that you just made.
Step 4: Create pull request
The last step to make your contribution official is to create a pull request.
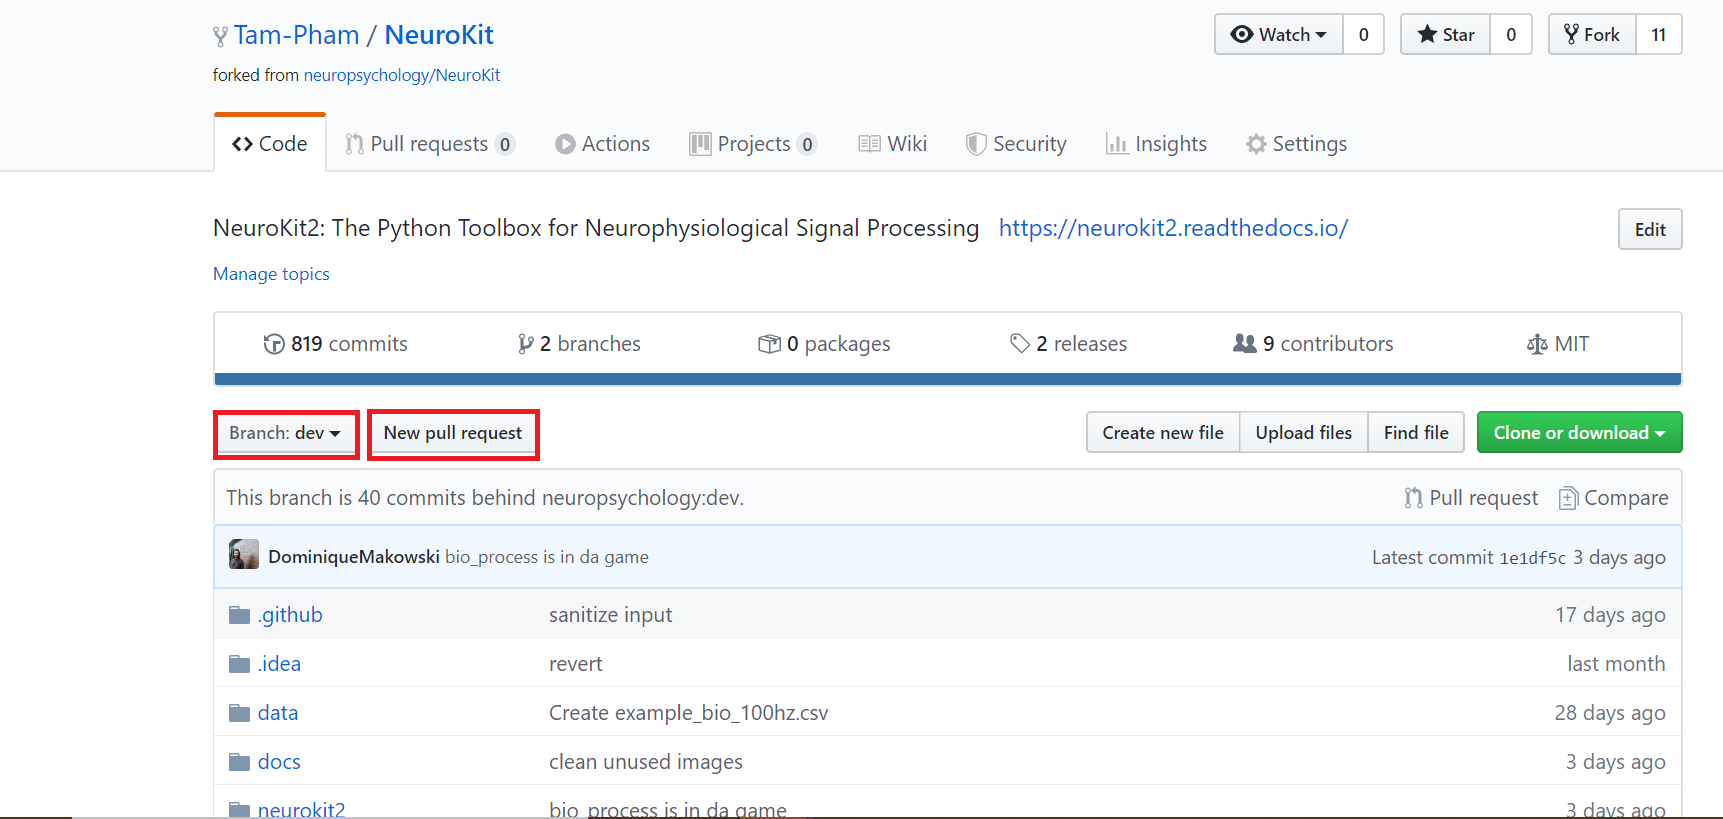
Go to your remote repository on Github page, the New Pull Request button is located right on top of the folders. Do remember to change your branch to dev since your commits were pushed to the dev branch previously.
And now, all that is left is for the maintainers of the package to review your work and they can either request additional changes or merge it to the original repository.
Step 5: Let’s do it
Let’s do it for real! If you have a particular feature in mind that you would want to add, we would recommend first opening an issue to let us know, so we can eventually guide you and give you some advice. And if you don’t know where to start or what to do, then read our ideas for first contributions. Good luck 💪
Useful reads
For instance, one way of starting to contribute could be to improve this file, fix typos, clarify things, add resources links etc. :)